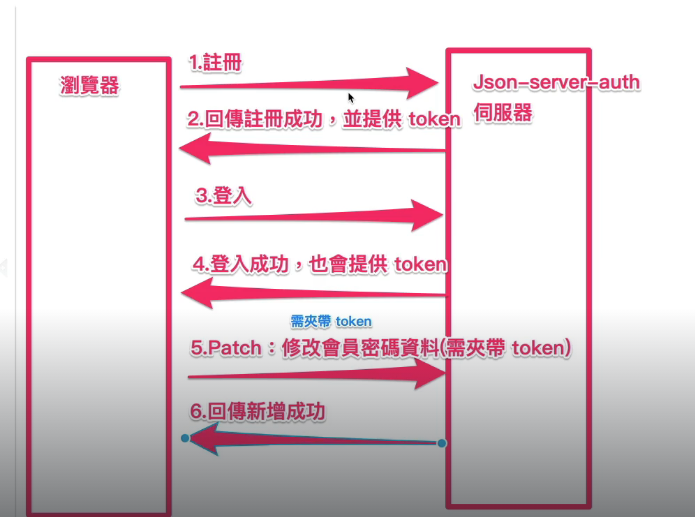
安裝流程
- 安裝 json-server-auth
json-server-auth 官網
1
| npm install -D json-server json-server-auth
|
- 在專案中建立 db.json
- 開啟 json-server
1
| json-server db.json -m ./node_modules/json-server-auth
|
註冊流程

email 和 password 為必填欄位,其他欄位可自由帶入
1
2
3
4
5
6
7
| {
"email": "olivier@mail.com",
"password": "bestPassw0rd",
"firstname": "Olivier",
"lastname": "Monge",
"age": 32
}
|
註冊成功回傳 token (時效為一小時) 和 user資料

1
2
3
4
5
6
7
8
9
10
11
12
13
| function signUp() {
axios.post('http://localhost:3000/register', {
"email": "olivier66662@mail.com",
"password": "bestPassw0rd",
"nickname": '偉杰'
})
.then((res) => {
console.log(res.data);
})
.catch(err => {
console.log('錯誤資訊', err.response)
})
}
|
註冊身分
如果想要區分註冊者身分,可以加上身份判別的陣列。之後登入時依照身分區別。
1
2
3
4
5
6
7
8
| {
"email": "olivier@mail.com",
"password": "bestPassw0rd",
"firstname": "Olivier",
"lastname": "Monge",
"age": 32,
"role": ["user", "admin"]
}
|
登入功能
POST /login
登入要帶入 email 和 password 欄位
1
2
3
4
| {
"email": "olivier@mail.com",
"password": "bestPassw0rd"
}
|
登入成功回傳 token 和用戶資訊

登入範例程式碼
1
2
3
4
5
6
7
8
9
10
11
12
| function logIn() {
axios.post('http://localhost:3000/login', {
"email": "olivier66662@mail.com",
"password": "bestPassw0rd",
})
.then((res) => {
token = res.data.accessToken;
})
.catch(err => {
console.log('錯誤資訊', err.response)
})
}
|
修改密碼(無權限)
使用 patch ,並在路由中帶入 user 的 id 即可修改user資料。
1
2
3
4
5
6
7
8
9
10
11
| function updatePassword() {
axios.patch('http://localhost:3000/users/1', {
"password": "336699",
})
.then((res) => {
console.log(res.data);
})
.catch(err => {
console.log('錯誤資訊', err.response)
})
}
|
修改密碼(有權限)
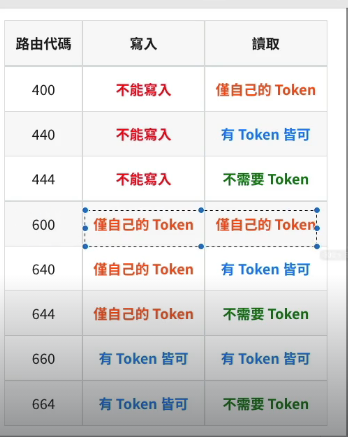
json-server-auth 提供了一個簡單的路由權限系統。權限設置基於路由模式和用戶角色,格式如下:

透過在路由中帶入權限設定的數字來控管權限。
以下範例權限為 600,代表必須登入取得token後,才能修改自己的資料。
1
2
3
4
5
6
7
8
9
10
11
12
13
14
15
16
|
function updatePassword() {
axios.patch('http://localhost:3000/600/users/3', {
"password": "336698889",
}, {
headers: {
"authorization": `Bearer ${token}`,
}
})
.then((res) => {
console.log(res.data);
})
.catch(err => {
console.log('錯誤資訊', err.response)
})
}
|
新增貼文
如果要新增貼文,路由中要設定權限為 600,只有自己能新增貼文到自己的帳號底下。
- 方法: 使用 POST 方法新增
- userId: 送出請求時要body帶入使用者 userId
- token: headers 要帶入 token 驗證。
1
2
3
4
5
6
7
8
9
10
11
12
13
14
15
16
| function addPost() {
axios.post('http://localhost:3000/600/posts', {
"content": "今天要洗臉",
"userId": id
}, {
headers: {
"authorization": `Bearer ${token}`,
}
})
.then((res) => {
console.log(res)
})
.catch(err => {
console.log('錯誤資訊', err.response)
})
}
|
如果不想在 body 上帶上 id,可以改在路由上帶入,寫法如下:
1
2
3
4
5
6
7
8
|
axios.post(`http://localhost:3000/600/users/${id}/posts`, {
"content": "今天要洗臉",
}, {
headers: {
"authorization": `Bearer ${token}`,
}
})
|


